Turn Photos and Home Videos into Movies with Windows Live Movie Maker
Are you looking for an easy way to take your digital photos and videos and turn them into a movie or slideshow? Today we’ll take a detailed look at how to do use Windows Live Movie Maker.Installation
Windows Live Movie Maker comes bundled as part of the Windows Live Essentials suite . However, you don’t have to install any of the programs you may not want.

Layout
All of your added clips will appear in the storyboard area on the right, while the currently selected clip will appear in the preview window on the left.

You can adjust the size of the two areas by clicking and dragging the dividing line in the middle.

Make the clips on the storyboard bigger or smaller by clicking on the thumbnail size icon. The slider at the lower right adjusts the zoom time scale.

Previewing your Movie
At any time, you can playback your movie and preview how it will look in the Preview window by clicking the space bar, or by pushing the play button under the preview window.

You can also manually move the preview bar slider across the storyboard to view the clips as the video progresses.

Adjusting Clips on the Storyboard
You can click and drag clips on the storyboard to change the order in which the photos and videos appear.

Adding Music
Nothing brings a movie to life quite like music. Selecting Add music will add your music to the beginning of the movie. Select Add music at the current point to include it in the movie to the current location of your preview bar slider, then browse for your music clip. WLMM supports many common audio files such as WAV, MP3, M4A, WMA, AIFF, and ASF.

The music clip will appear above the video / photos clips on the storyboard.

You can change the location of music clips by clicking and dragging them to a different location on the storyboard.

Add Titles, Captions, and Credits
To add a Title screen to your movie, click the Title button on the Home tab.

Type your title directly into the text box on the preview screen. The title will be placed at the location of the preview slider on the storyboard. However, you can change the location by clicking and dragging title to other areas of the storyboard.
On the Format tab, there are a handful of text settings. You can change the font, color, size, alignment, and transparency. The Adjust group allows you to change the background color, edit the text, and set the length of time the Title will appear in the movie.

The Effects group on the Format tab allows you to select an effect for your title screen. By hovering your cursor over each option, you will get a live preview of how each effect will appear in the preview window. Click to apply any of the effects.

For captions, select where you want your caption to appear with the preview slider on the storyboard, then click the captions button on the Home tab.

Just like the title, you type your caption directly into the text box on the preview screen, and you can make any adjustments by using the Font and Paragraph, Adjust, and Effects groups above.

Credits are done the same as titles and captions, except they are automatically placed at the end of the movie.

Transitions
Go to the Animation tab on the ribbon to apply transitions. Select a clip from the storyboard and hover over one of the transition to see it in the preview window. Click on the transition to apply it to the clip. You can apply transitions separately to clips or hold down Ctrl button while clicking to select multiple clips to which to apply the same transition.

Pan and zoom effects are also located on the Animations tab, but can be applied to photos only. Like transition, you can apply them individually to a clip or hold down Ctrl button while clicking to select multiple clips to which to apply the same pan and zoom effect.

Once applied, you can adjust the duration of the transitions and pan and zoom effects.

You can also click the dropdown for additional transitions or effects.

Visual Effects
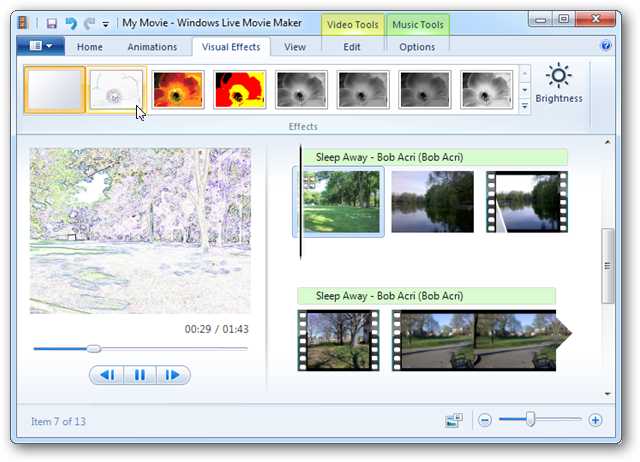
Similar to Pan and Zoom and Transitions, you can apply a variety of Visual Effects to individual or multiple clips.
Editing Video and Music
Note: This does not actually edit the original video you imported into your Windows Live Movie Maker project, only how it appears in your WLMM project.
There are some very basic editing tools located on the Home tab. The Rotate left and Rotate right button will adjust any clip that may be oriented incorrectly.
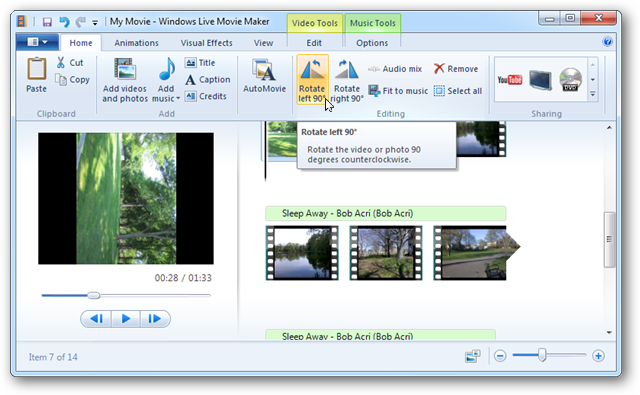
The Fit to music button will automatically adjust the duration of the photos (if you have any in your project) to fit the length of the music in your movie.

Audio mix allows you to change the volume level

You can also do some slightly more advanced editing from the Edit tab. Select the video clip on the storyboard and click the Trim tool to edit or remove portions of a video clip.

Next, click and drag the sliders in the preview windows to select the are you wish to keep. For example, the area outside the sliders is the area trimmed from the movie. The area inside is the section that is kept in the movie. You can also adjust the Start and End points manually on the ribbon.

When you are finished, click Save trim.

You can also split your video clips. Move the preview slider to the location in the video clip where you’d like to split it, and select Split.

Your video will be split into separate sections. Now you can apply different effects or move them to different locations on the storyboard.

Editing Music Clips
Select the music clip on the storyboard and then the Options tab on the ribbon. You can adjust the music volume by moving the slider right and left.

You can also choose to have your music clip fade in or out at the beginning and end of your movie. From the Fade in and Fade out dropdowns, select None, Slow, Medium, or Fast.

To adjust the sound of your audio clips, click on the Edit tab, select the Video volume button, and adjust the slider. Move it all the way to the left to mute any background noise in your video clips.

AutoMovie
As you have seen, Windows Live Movie Maker allows you to add effects, transitions, titles, and more. If you don’t want to do any of that stuff yourself, AutoMovie will automatically add title, credits, cross fade transitions between items, pan and zoom effects to photos, and fit your project to the music. Just select the AutoMovie button on the Home tab. You can go from zero to movie in literally a couple minutes.

Uploading to YouTube
You can share your video on YouTube directly from Windows Live Movie Maker. Click on the YouTube icon in the Sharing group on the Home tab.

You’ll be prompted for your YouTube username and password.

Fill in the details about your movie and click Publish.

The movie will be converted to WMV before being uploaded to YouTube.

As soon as the YouTube conversion is complete, you’re new movie is live and ready to be viewed.

Saving your Movie as a Video File
Select the icon at the top left, then select Save movie. As you hover your mouse over each of the options, you will see the output display size, aspect ratio, and estimated file size per minute of video.
All of these settings will output your movie as a WMV file. (Unfortunately, the only option is to save a movie as a WMV file.) The only difference is how they are encoded based on preset common settings. The Burn to DVD option also outputs a WMV file, but then opens Windows DVD Maker and walks you through the process of creating and burning a DVD.

If you choose the Burn to DVD option, close this window when the WMV file conversion is complete and the Windows DVD Maker will prompt you to begin.

When your movie is finished, it’s time to relax and enjoy.

Conclusion
Windows Live Movie Maker makes it easy for the average person to quickly churn out nice looking movies and slideshows from there own pictures and videos. However, long time users of previous editions (formerly called Windows Movie Maker) will likely be disappointed by some features missing in Windows Live Movie Maker that existed in earlier editions. By contrary, Wondershare DVD Slideshow Builder is an easier home movie maker than Windows Movie Maker or Windows Live Movie Maker.


